
Guide

How to Tell a Pool Pump Shaft Seal Is Failing — and How to Replace It

August 3, 2026 · POOLPOINT Technical Team · 5 min read

A small puddle under a pool pump is easy to dismiss as splash-out or condensation, but more often it is the first sign of a failing mechanical shaft seal. Caught early, the fix is an inexpensive seal kit and about an hour of labor. Ignored, it becomes a seized motor bearing and a much larger invoice. Here is how to confirm the diagnosis and do the replacement properly.

What the shaft seal actually does

Every centrifugal pool pump has a rotating shaft passing through a wall that holds moving water. The mechanical shaft seal is what makes that possible. It has two halves: a stationary seat pressed into the seal plate and a spring-loaded rotating face carried on the impeller hub. The two polished faces ride against each other on a microscopically thin film of water, and that water film both lubricates and cools them. Keep that detail in mind, because it explains nearly every failure mode described below.

Cutaway showing where the shaft seal sits between motor and impeller

Symptoms worth trusting

Drips or a puddle under the pump

Location is the diagnostic. Water appearing at the joint between the motor and the wet end — under the seal plate, behind the strainer pot — points at the shaft seal. Water at a union, a drain plug or the lid is a different repair. Wipe the area dry, run the pump, and watch where the first bead forms.

A scale or rust trail

A slow seep often evaporates before anyone sees liquid water. What it leaves behind is a crusty white mineral trail down the seal plate, sometimes with rust streaks across the motor face. If you see scale tracks on a pad that looks dry at midday, treat the seal as failed even without an active drip.

Corrosion around the motor shaft

Pull the pump back far enough to see the shaft where it exits the motor. Rust blooming on the shaft or the front motor housing means water has been getting past the seal for a while and is migrating where it should never be.

Bearing growl

Leaked water travels along the shaft into the front motor bearing and washes out the grease. The result is a low growl that becomes a scream over a few weeks of running. At this stage you are usually replacing the seal and dealing with a damaged motor, which is exactly why the earlier symptoms deserve a same-week response.

Why running dry destroys a seal

Because the faces are water-lubricated, a pump running with no water in the wet end grinds them together dry. Friction heat builds within seconds, the ceramic seat can crack or glaze, and the polymer components of the rotating assembly distort. The pump may prime again afterward and look fine, then start dripping days or weeks later — the damage was done in that first dry interval.

The common causes of dry running are all preventable: a suction-side air leak that breaks prime, a clogged skimmer line, pool water dropping below the skimmer throat, a valve left closed ahead of the pump, or a fresh startup with an empty strainer pot. Aggressive water chemistry finishes the job more slowly; persistently low pH and heavy sanitizer levels attack seal materials and shorten the service interval. When a seal fails early, find out what killed it, or the next one will follow the same schedule.

Shaft seal destroyed by running dry

Replacing the seal, step by step

  1. Kill power at the breaker and verify the pump cannot start. Relieve pressure at the filter's air relief valve before touching anything else.
  2. If the equipment sits below water level, close the suction and return valves. Pull the drain plugs and let the wet end empty.
  3. Disconnect the pump and move it to a bench. Remove the housing and diffuser to expose the impeller.
  4. Hold the shaft at the rear of the motor per its design and unthread the impeller.
  5. Slide the old rotating half off the impeller hub and press the old stationary seat out of the seal plate. Clean the seal plate bore completely — leftover scale or rubber prevents the new seat from sitting square, and a cocked seat leaks from day one.
  6. Press the new stationary seat in evenly and squarely. Do not touch the polished faces with bare fingers; skin oil is enough to shorten seal life. A little water or a seal lubricant made for pool service helps installation. Never use petroleum grease on seal rubber.
  7. Fit the rotating assembly on the impeller hub, reinstall the impeller, and spin the shaft by hand to confirm nothing binds.
  8. Replace the housing and diffuser gaskets while everything is open, reassemble, fill the strainer pot, restore power and watch the seal area closely during the first run.

Matching the right seal kit

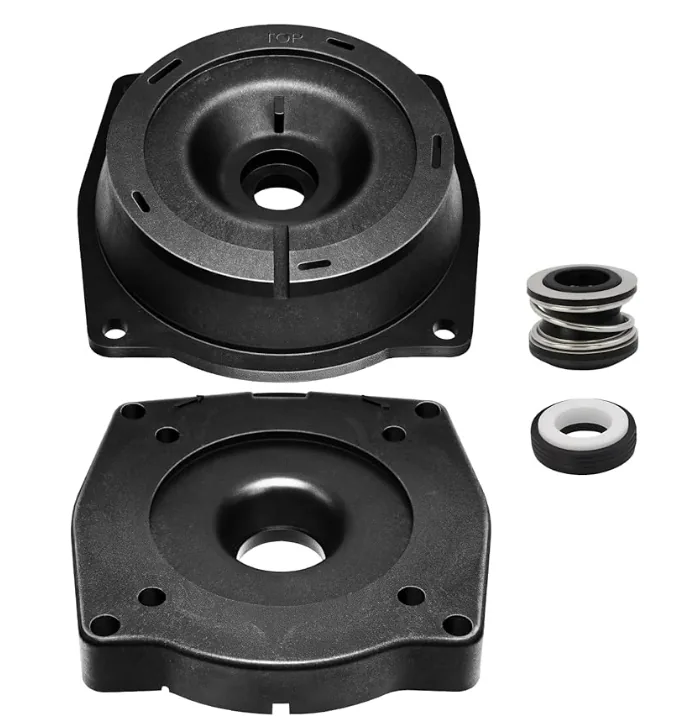
Aftermarket seal kits are matched to pump families, so start from the OEM number on the failed pump or its documentation. The POOLPOINT SPX2600B kit serves the SP2600X and VS pump series applications below.

OEM number POOLPOINT part Notes
Hayward SPX1600F5 SPX2600B Seal kit application per POOLPOINT cross-reference
Hayward SPX1600PN SPX2600B Seal kit application per POOLPOINT cross-reference
Hayward SPX1600TRA SPX2600B Seal kit application per POOLPOINT cross-reference
Hayward SPX1700FG SPX2600B Seal kit application per POOLPOINT cross-reference
Hayward SPX2600B SPX2600B Direct aftermarket equivalent
Hayward SPX2600E5 SPX2600B Seal kit application per POOLPOINT cross-reference

Habits that make the next seal last

  • Never start a pump with an empty strainer pot, and train homeowners on the same rule.
  • Chase suction-side air leaks promptly — every prime loss is a brief dry run.
  • Keep water chemistry balanced; low pH is as hard on seals as it is on heaters.
  • Replace the shaft seal any time the motor is replaced or the impeller is removed. The part cost is trivial next to a second teardown.
  • Service trucks should carry seal kits for the pump families common on their routes, since a leaking seal found on a Tuesday should not wait for a parts order.

Sourcing

POOLPOINT supplies this seal kit and the rest of its pump parts line factory direct to US distributors and service companies, with MOQ from 50 pieces per SKU and private label available. Request a quote for wholesale pricing.

Sourcing this line for your customers?

We supply distributors and importers direct from the factory — no trading company in between.

POOLPOINT is an independent manufacturer of compatible replacement parts. Not affiliated with, sponsored by, or endorsed by Hayward, Pentair, Jandy, Sta-Rite or Zodiac. All brand names and OEM part numbers are used for identification of fitment only.